The Basics: Why is my Wi-fi so slow and how do I fix it
Use a standalone router with DSL service
In this article, we will learn how to configure a router in Transparent Bridging Mode with DSL service.
Basic W-Fi Lessons
Using a standalone router with DSL service
Many ISPs will either sell or rent you a modem and router combo box. It includes both a DSL modem and a wireless router, all in one box.
These little combo boxes are usually okay, but you might want to upgrade to a better router that supports 5 GHz, has a better firewall, and has more features.
We don't want to simply connect a new router to this one via ethernet, because then we'd have two NAT's and two firewalls, which could cause connection problems for some applications. Basically, it would be sloppy networking, and we don't want that.
Instead, we need our modem to be just a modem, and our new router to handle all of the routing. This was pretty common back in the day, but it isn't common anymore.
To make the modem be just a modem, we need to put it in Transparent Bridging Mode. That way, the modem will handle talking to your ISP, and the router will route all of the traffic on your network. Two boxes that are each dedicated to doing their own job.
In this case, we are using a CenturyLink modem and router combo and an Apple AirPort Extreme, but you can apply these concepts to most other DSL modems and home routers.
In the 2.4 GHz band, 1, 6, and 11 are the only non-overlapping channels. Selecting one or more of these channels is an important part of setting up your network correctly. Currently, many wireless routers automatically select the channel for you upon initial setup, where depending on your wireless environment, it could lead to slow Wi-Fi speeds and interference. This article will describe what interference you're dealing with and takes you through the steps to selecting the right channel, so you can understand why you should choose between channel 1, 6, and 11.
Get Reliable Wi-Fi at Home
For professionals working from home, students studying from home, and teachers teaching from home, reliable home Wi-Fi is part of what we need to get through our day.
Signifi Personal tells you what’s wrong and helps you make it right.

Configure the Modem
1. Before you get started, obtain your PPPoE username and password from CenturyLink.
Note: You may be able to log into your current router and copy it out into a text file, but if the password is hidden, you might need to give CenturyLink a call. Just say, "I need my PPPoE username and password" and they should know what you are talking about.
2. Connect to your modem via ethernet. If you're already connected via Wi-Fi, that's fine.
3. Go to 192.168.0.1 in your web browser to open up the settings page for the modem.

4. Log in to your modem with the credentials on the bottom. It's usually “admin” and a random password.

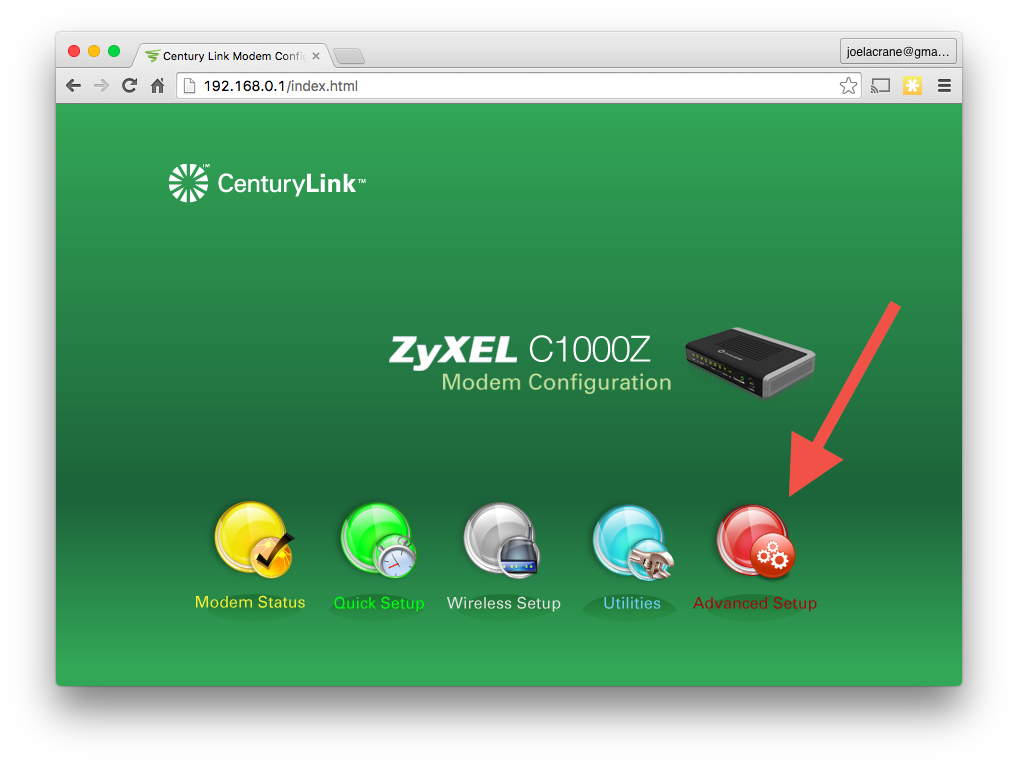
5. Click on Advanced Setup.
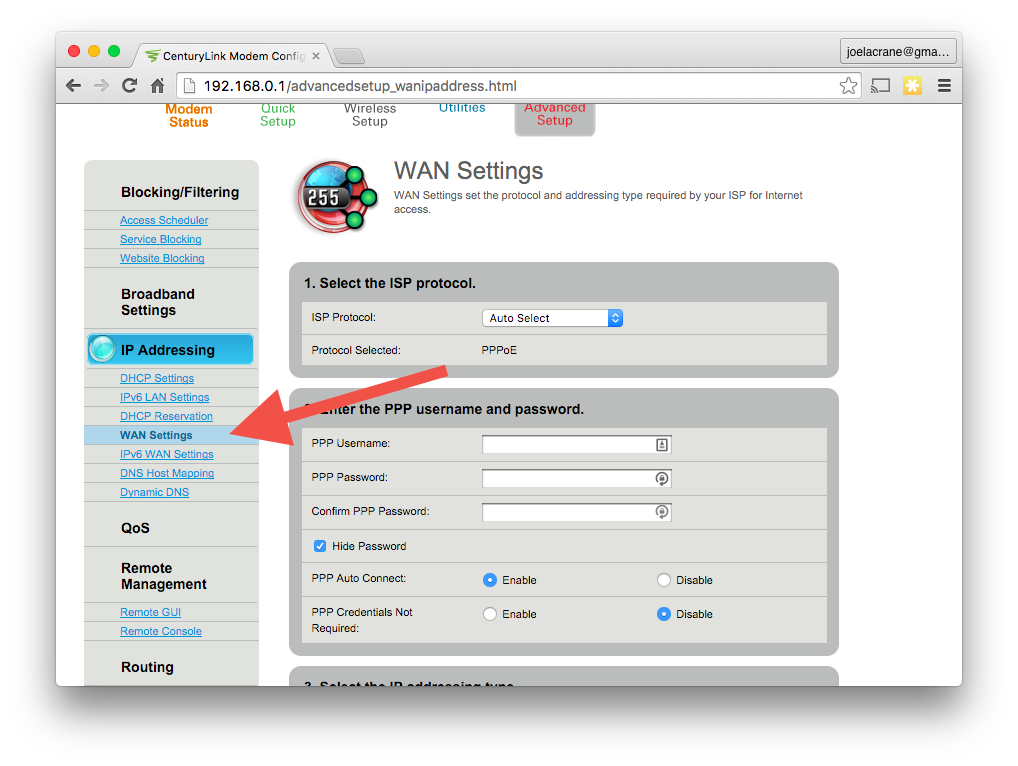
6. On the menu on the left, click on the WAN Settings link.
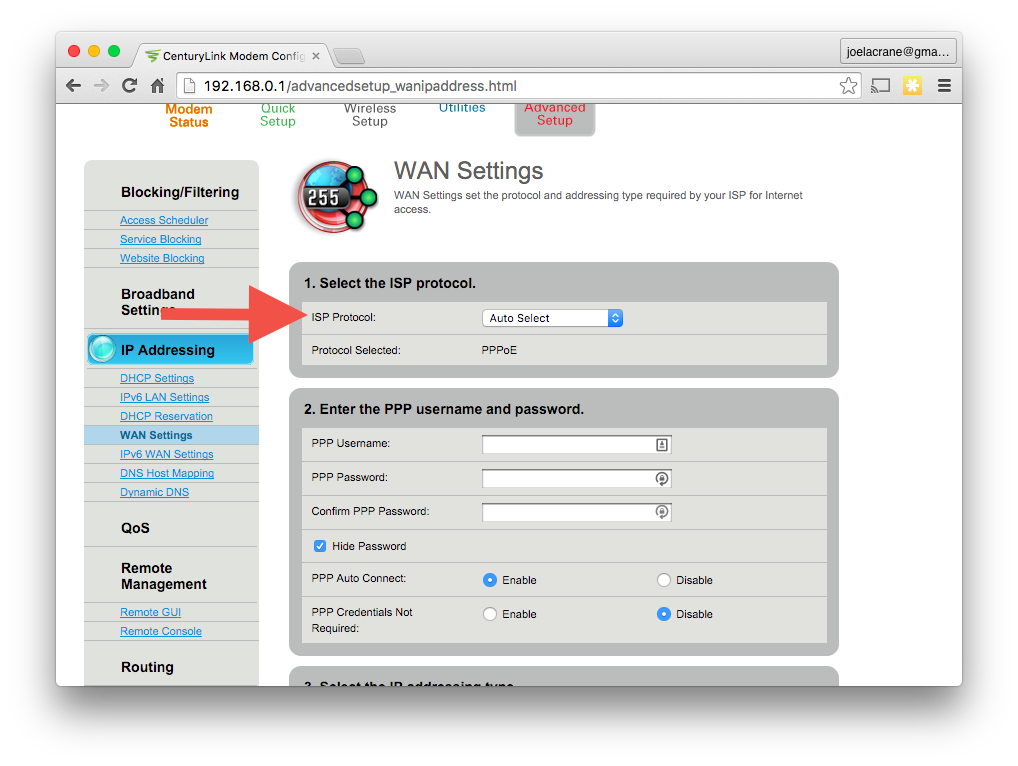
7. Find the ISP Protocol drop-down menu.
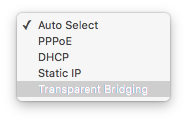
8. Select Transparent Bridging from the ISP Protocol menu.
9. Click the Apply button to save settings and reboot the rout... I mean, modem, since now it's really just a modem.
Configure the Router
Now that the modem/router combo is in “Transparent Bridging” mode, it's no longer functioning as a router, and is only functioning as a DSL modem. We are now ready to go configure our new router, which in our case is an Apple AirPort Extreme (but you can apply these concepts to any consumer wireless router).
11. Unplug your ethernet cable from the modem, and plug it into one of the LAN ports on your new router.
12. Open the AirPort utility, and click on the Internet tab.
13. Change Connect Using to PPPoE, and using the CenturyLink account info we looked up earlier, fill in the Account Name and Password fields.
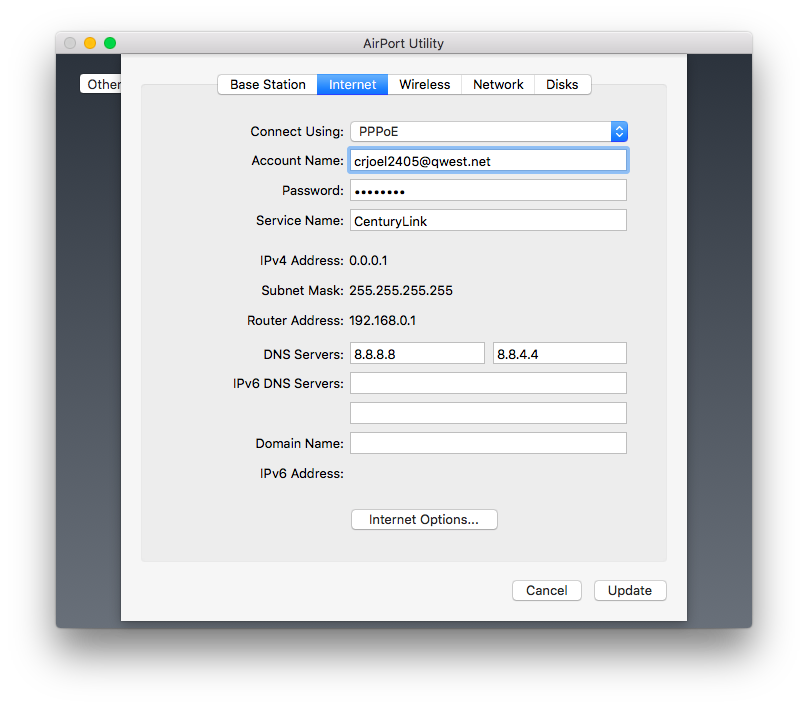
14. As a bonus step, change the DNS servers to 8.8.8.8 and 8.8.4.4, and configure your wireless network. Be sure to give it a name you like and enable 5 GHz.
Note: When you are done with this guide, be sure to use inSSIDer to pick the best channel for your new router!
15. Click the Update button to save the changes.
16. Connect an ethernet cable from the AirPort Extreme's WAN port and port 1 on the modem.
17. The AirPort Extreme will tell the modem to dial in, and the light on the AirPort Extreme will turn green to say that everything is working. Connect via Wi-Fi, and enjoy your new router!
