The Basics: Why is my Wi-fi so slow and how do I fix it
Slow Wi-Fi Reason 1: Dead Spots and Insufficient Coverage
The only thing more frustrating than Wi-Fi that doesn't work at all is Wi-Fi that sort of works, sometimes, and only in some areas. In this article, we'll discuss why Wi-Fi sometimes works in parts of your coverage area but is slow or intermittent in others, and how to fix it.
Basic W-Fi Lessons
Dead Spots and Insufficient Coverage
Many Wi-Fi users experience poor connectivity and slow speeds. In one room it doesn’t work at all, and in another speed may be too slow. To achieve a good connection, Wi-Fi has to overcome barriers and obstacles - some of which can’t be eliminated by simply purchasing a new wireless router.
Diminishing signal strength creates dead spots
A strong signal is often a good indicator that the Wi-Fi connection will be fast and reliable instead of slow and intermittent. We can compare this to hearing other people talk – in a quiet, open area, you can hear someone’s voice fairly well. On the other hand, in a building with thick walls, listening becomes more difficult. The same is true for indoor Wi-Fi. As distance increases, the wireless signal strength decreases, and different types of obstructions will further reduce signal strength.
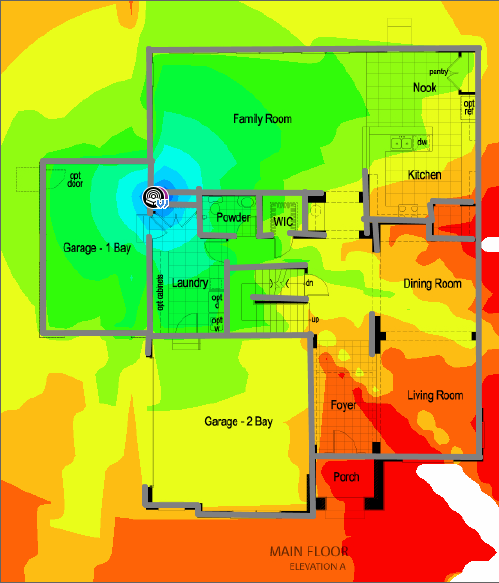
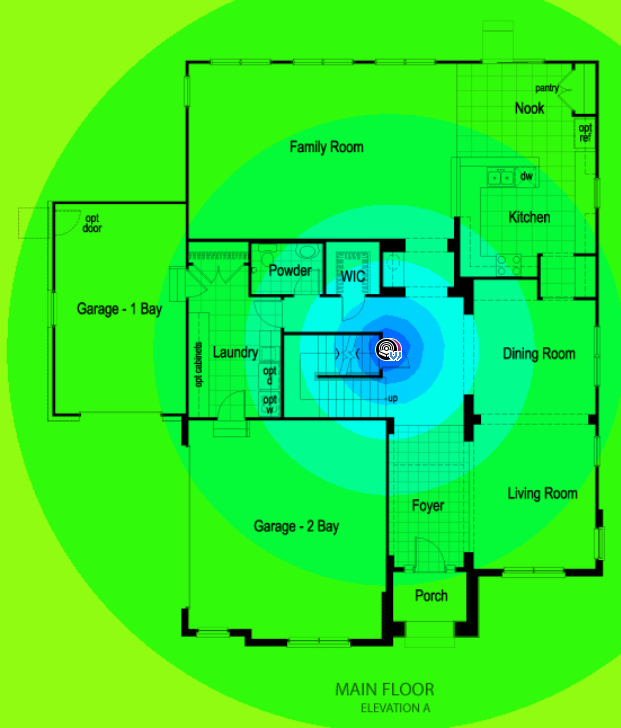
The below example shows what Wi-Fi signal strength would look like with and without building walls. The red colors represent a signal strength too low for good Wi-Fi connectivity:

Wi-Fi Signal Strength Loss From Indoor Walls

Free Space Path Loss With No Attenuation from Walls
Use the following guidelines to gauge how different materials in your home affect the signal strength of Wi-Fi. Keep in mind that a 3 dB drop is equivalent to a 50% reduction in power!
- Dry Wall: 3 dB
- Hollow Wood Door: 4 dB
- Brick Walls: 6 dB
- Concrete: 8 dB
- Refrigerator: 19 dB
What To Do
Step 1: Get inSSIDer
Download inSSIDer for Windows or inSSIDer for Mac. To run inSSIDer, you'll need a (free) MetaGeek account, which you can get here.
Step 2: See your real-time signal strength
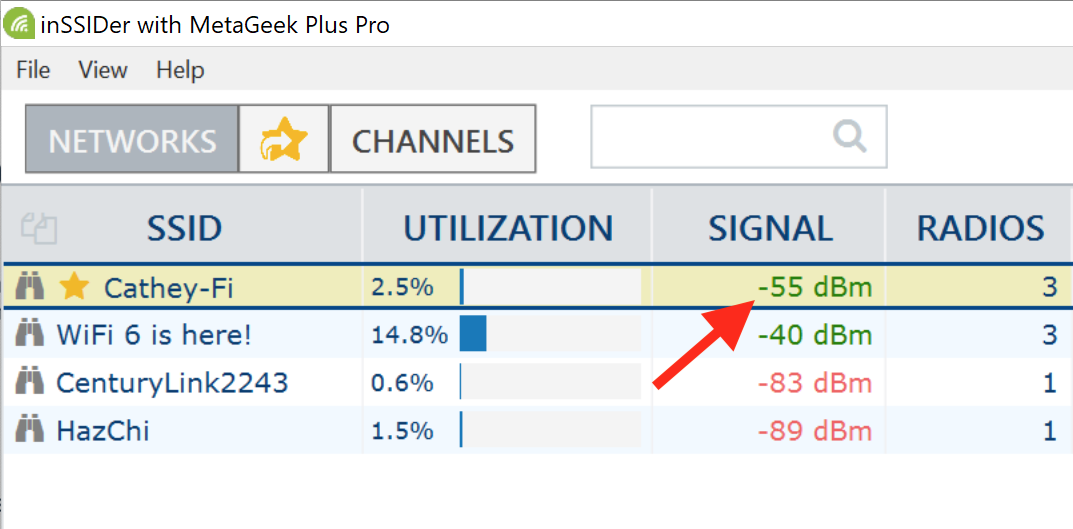
With inSSIDer installed and open, find your wireless network’s name, or SSID, and take note of its signal strength in the Signal column. What do you see?

-55 dBm indicates good coverage

-74 dBm is not ideal coverage
A reliable signal strength to strive for is at least -67 dBm or higher (-60, -50, -40 dbm, etc). For media hungry households with streaming video, you might even want to strive for -60 dBm or higher. Anything lower than this (-70, -80, -90 dBm) means that the AP or router is too far away. The farther away you are from your router or AP, the lower the data rate, meaning slower Wi-Fi. You can read more about signal strength and data rates here.
Step 3: Measure signal strength as you move around
Walk around to each area in your home or office environment that requires reliable Wi-Fi and take the same measurements. You can watch as I do this in this video here using Network Snapshots to take room-by-room measurements. Give it a try! If you find that you have poor coverage (-70, -80, -90 dBm, etc.), you will either need to move the AP and client closer to each other, or add another AP.
Get Complete Network Visibility
If you’re a network engineer or installer that works on mission-critical Wi-Fi networks, you need the right tools for the job.
MetaGeek’s professional spectrum and packet tools help you design and deploy secure, reliable WLAN networks.

Interference from competing networks creates slow Wi-Fi zones
Slow connectivity in an area can be caused by competing networks on
the same or overlapping channel. When a Wi-Fi channel has a lot of
active users on several networks, the speeds decrease for everyone.
Unfortunately, the channel doesn’t belong to just you, and you can’t
stop other networks from using it.
Your best option is to use a channel with no overlapping networks or
share a channel that has networks with low signal strength. There
are two types of Wi-Fi interference that can slow you down:
Co-Channel Interference - Networks sharing a channel cooperate and take turns talking. Channel bandwidth is shared between every Wi-Fi device.
Overlapping Interference - Networks on non-standard or overlapping channels are unable to cooperate, and will cause interference on neighboring networks. They share bandwidth with networks on standard channels.

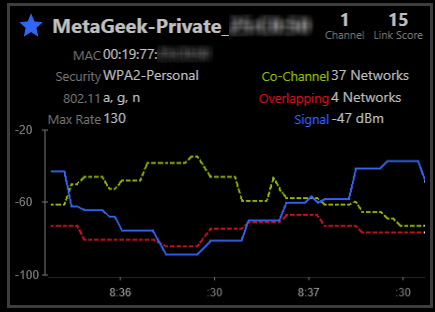
Network Strength compared to Co-Channel and Overlapping Interference
inSSIDer’s
algorithm only measures the signal strength of a single wireless
router and assumes each competing network is equally active. (For
more accurate interference assessments, you will need to use more
advanced tools like Spectrum and Packet Analyzers).
To avoid Wi-Fi slowness, find a channel that has the least amount of
co-channel and overlapping interference. That means you want the
fewest networks to be on your channel - and if they are, you want
them to be relatively quiet (lower signal strength).
What To Do
This exercise assumes you have already found an ideal central
location for your wireless network. It also requires you to know
how to configure and change the channel of your wireless router.
If you do not know how, please consult your user manual.
inSSIDer
will display a link score for your network, which is a number that
accounts for signal strength as well as the level of co-channel
and overlapping interference. The Link Score is an estimation, and
it assumes that each network is equally active. Follow these steps
to find the best channel:
- Use inSSIDer to measure the link score in each room.
- Try channels 1, 6, or 11 of your wireless router.
- Measure the link score in each room.
- Choose the channel with the best aggregate link score for each room.
Dead Spots from Non-Wi-Fi devices
Sometimes you may have excellent signal strength, but little to no connectivity. These dead spots can be caused by competing wireless devices that use the same frequencies as Wi-Fi, but do not cooperate with Wi-Fi. Here are a few common devices that cause dead spots in the home:
- Cordless Phones
- Wireless Audio Systems
- Nanny Cams
- Microwave Ovens
- Wireless Security Systems

Only Wi-Spy can show you non-Wi-Fi interference
Should I just let my router auto-select the right Wi-Fi channel?
In short - no! Many wireless modems and routers have an auto-channel selection algorithm in order to provide a better connection, but this can cause more headaches than it solves. Auto channel selection is blind to non-Wi-Fi sources, and makes its selection only on the number of interfering networks sharing the same channel. It may also put your wireless network on a non-standard channel, which introduces even more interference from multiple sources. In the end, auto channel selection does not solve any problems. If anything, it makes the problem more intermittent and extremely difficult to troubleshoot. The best long-term solution is to use a tool like inSSIDer (small networks) or Chanalyzer (complex networks) with a Wi-Spy DBx to monitor your Wi-Fi environment and assign your access point to the channel with the least interference.
What To Do
Without a spectrum analyzer, it is difficult to definitively
conclude anything regarding non-Wi-Fi interference.
Learn more about spectrum analysis.
The following steps will help you systematically test other wireless devices for Wi-Fi interference:
- Download TamoSoft Throughput Test Utility, and install it on two computers
- Set up the first computer as a Server, and the second as a Client
- Begin the Test
- Turn on and use the non-Wi-Fi device in question to see if it affects the performance.
- Restart the wireless device to see if it changed its channel. Try this a few times, until you have determined whether or not your Wi-Fi is affected by the device.
The More You Know
Slow zones and dead spots can occur for a variety of reasons. You
can avoid these pitfalls by moving your wireless router to a central
location and choosing a better channel, which we've learned about
this this lesson.
Utilizing proper Wi-Fi knowledge and troubleshooting tools as you
build out into the future will ensure you are able to identify what
may be the root cause of poor Wi-Fi performance.
